
Merge Member Profile Guide
The Loyalty platform allows clients to merge two Member Profiles into a single Profile. This feature is useful if, for example, you learn that an individual has accidentally created two membership accounts, perhaps using different email addresses.
The platform utilizes the following terminology to distinguish between the two Profiles being merged:
-
Source Profile: After the merge is complete, this Profile will be deactivated.
-
Target Profile: After the merge is complete, this Profile will remain active, and will contain the fully merged information from both Profiles.
Note: Merging Profiles is irrevocable; you can’t revert or undo a Profile merge. In addition, after the merge is complete, you can’t “reverse” a merge to flip the Source and Target. Be sure you carefully select which Profile is to be the Target, and which is to be the Source.
Merge Data Options
The platform supports a wide range of options that control what information gets included when merging Member Profiles. These options can be configured through a combination of Program Settings and internal flags. For more information, see Program Settings Category - Merge Accounts. Reach out to your Zeta Global team if you have any questions about configuring these settings.
The Program Settings applicable to merging Member Profiles are as follows:
-
Merge Attributes: This setting indicates whether or not to include Member Attributes when performing the merge process. If enabled, the platform will merge the Attributes selected in the Member Attributes Program Setting (see below).
-
Member Attributes: If you enabled the Merge Attributes setting above, the Member Attributes setting allows you to select the specific Member Attributes to be transferred from the Source Profile to the Target Profile. The following data types are supported through the Member Profile merge process: String, Boolean, Date, Email, Integer, and DateTime.
-
Member Attributes to Prefix: If this setting is enabled, the platform will prefix the selected Member Attribute values with “_merged_” in the deactivated Source Profile. This prefix can be applied to email, card ID, and mobile phone Attributes. For example:
-
email: ‘_merge_johnsmith@gmail.com’
-
card_id: ‘_merge_123456789’
-
mobile_phone: ‘_merge_+15551234567’
-
-
Merge Metrics: This setting indicates whether or not to include Metrics when performing the merge process. If enabled, the platform will merge the Metrics selected in the Metrics Program Setting (see below).
When Metrics are merged from the Source Profile to the Target Profile, the changes are indicated as "Earn Adjustments," "Redeemed Adjustments," and "Expired Adjustments" in the Target Member's Activity history.
If your loyalty program utilizes Tiers, the platform will automatically re-evaluate the Target Profile, and make any necessary Tier adjustments based on their new Metric balances after the merge. These changes are indicated as "Tier Adjustments" in the Target Member's Activity history.
-
Metrics: If you enabled the Merge Metrics setting above, the Metrics setting allows you to select the specific Metrics to be transferred from the Source Profile to the Target Profile. Please note, if your loyalty program utilizes multiple Metrics, the values from a specific Metric in the Source Profile will be merged with that same Metric in the Target Profile. You can't merge values from one Metric in the Source Profile into a different Metric in the Target Profile.
-
Response Types: This setting determines which (if any) Response types should be transferred from the Source Profile to the Target Profile. The available Response types that can be merged are: Orders, Rewards, Offers, Challenges, Punch Cards, Gift Cards, and Codes.
-
Change Behavior of Visitor Account: This setting controls how the platform handles a merge between a Visitor and a Member. Please note that the platform will never include Metrics in this scenario, even if the Metrics setting described above is enabled.
-
If this flag is disabled, only Orders will be included in the merge process.
-
If the flag is enabled, the platform treats the Visitor as a Member and the merge process proceeds as normal (with the exception of not merging Metrics, as noted above).
-
The internal flags applicable to merging Member Profiles are as follows. Please speak to your Zeta Global team about making changes to these flags.
-
Member Activities: If enabled, the platform will include Member Activities in the merge process. Use caution when enabling this flag, as it may have unintended consequences, such as causing Triggered Actions to execute based on the merged Activity records.
-
Merge Empty Attributes Only: This flag determines if Source Profile Attribute values can overwrite existing Target Profile Attribute values. If disabled, Source Profile Attributes will overwrite Target Profile Attributes, even when a value is already present in the Target Profile Attribute. If enabled, the platform skips the merge of a Source Profile Attribute value where the Target Profile Attribute has a value present, preserving the value entered in the Target Profile Attribute.
Profile Merge Methods
The platform supports several different methods (described below) of merging Member Profiles.
Member Profile Merge: Manual
The platform allows Customer Service Representatives to manually merge Member Profiles from the Member Profile screen. For details on this process, please see Merge Member Profiles.
Member Profile Merge: API
Clients can be more efficient, and have more flexibility in their Member account management, by automating the Member Profile merge process. This automation can be handled by a central system, such as a Customer Relationship Management (CRM) system or a Customer Data Platform (CDP), or through an internal support network or help desk queue. This central system can use the Loyalty platform's Member Merge API to initiate the merge process. The API call must include the identifiers of the two Members to be merged, being sure to correctly identify the Target (or primary) Profile to be retained, and the Source Profile to be merged and deactivated.
API Request
To make a merge Member request, send a POST request to the Member Merge endpoint:
-
<base_url>/program/api/members/<id>/merge
Within the URL, replace <id> with the identifier of the Target Profile.
The request must include a Form parameter named member_to_merge that is populated with the identifier of the Source Profile.
Note: The platform supports the use of the following identifiers: id, member_id, integration_id, card_id, mobile_phone, and email.
Example cURL request:
curl -X POST
     -H 'Accept: application/vnd.stellar-v1+json'
     -F "access_token=<access_token>"
     -F "member_to_merge=marysmith@gmail.com"
     <base_url>/program/api/members/johnsmith@gmail.com/merge
For more information, please see the Loyalty platform's Program API documentation.
Note: A username / password is required to access the Loyalty platform's Program API documentation. Please contact your Zeta Global team for assistance.
API Response
After a successful Member Profile merge, the platform returns a response that includes a "success" status indicator, the Target Profile ID ("primary_member_id"), and the Source Profile ID ("merged_member_id").
Example JSON Success Response:
{
  "success": true,
  "data": {
    "primary_member_id": "johnsmith@gmail.com",
    "merged_member_id": "marysmith@gmail.com"
  }
}
If the merge was unsuccessful, the response message includes an error message indicating the nature of the problem. Possible validation errors include:
| Error Code | Message | Description |
|---|---|---|
| 4044 | not_available | Either the Target Profile identifier or the Source Profile identifier is invalid. |
| 4300 | same_member_identifier | The Target Profile and the Source Profile in the request message had the same identifier. |
| 4301 | target_member_deactivated | The Target Profile is deactivated. |
| 4302 | source_member_deactivated | The Source Profile is deactivated. |
| 4303 | member_already_merged | The Source Profile was previously merged to the Target Profile. |
Example JSON Error Response:
{
  "code": 4300,
  "name": "same_member_identifier",
  "message": "Target and Source Member are the same"
}
Member Profile Merge: Ad Hoc Batch Import
The platform allows you to execute an ad hoc batch job that processes one or more Member Profile merges. The Profiles to be merged must be defined in an import file stored on your local PC. This process utilizes the Batch Action feature. For details on this process, please see Create a Batch Action - Merge Member Profiles.
Member Profile Merge: Scheduled Batch Import
Similar to the ad hoc import described above, the platform allows you to merge Member Profiles via a Scheduled Job. This feature allows you to import a file of Member Profiles that need to be merged, but with the added ability to schedule when the job executes. In addition, the import file can be stored on an external SFTP server, which allows you to automate the process of importing Member Profiles that need to be merged.
The import file must be a comma-separated values (CSV) file that contains a header row and the following two columns:
-
member_id: The Member ID for the Target Profile
-
source_member_id: The Member ID for the Source Profile.
To define a Scheduled Job for merging Member Profiles:
-
Select Admin from the top navigation bar, then select Jobs > Scheduled Jobs from the side navigation menu. The Scheduled Jobs screen is displayed.
-
In the Display Name field, enter a name for the new Scheduled Job.
-
Click Create. The Edit Scheduled Job pop-up window is displayed.

-
Optionally, in the Description field, enter a description of the new Scheduled Job.
-
From the Recurrence drop-down menu, select one of the following:
-
Once: Enter the date and time when you want the Scheduled Job to execute.
-
On Demand: Manually execute the Scheduled Job.
-
Recurrence: Define the recurrence frequency.
-
-
Toggle Active to On.
-
From the Log Every Run drop-down menu, select Yes.
-
From the Priority drop-down menu, select either Default or High.
-
Optionally, to generate email notifications, enter one or more email addresses in the Notification Emails field. Please see Scheduled Jobs for more information on the types of email notifications that the platform generates.
-
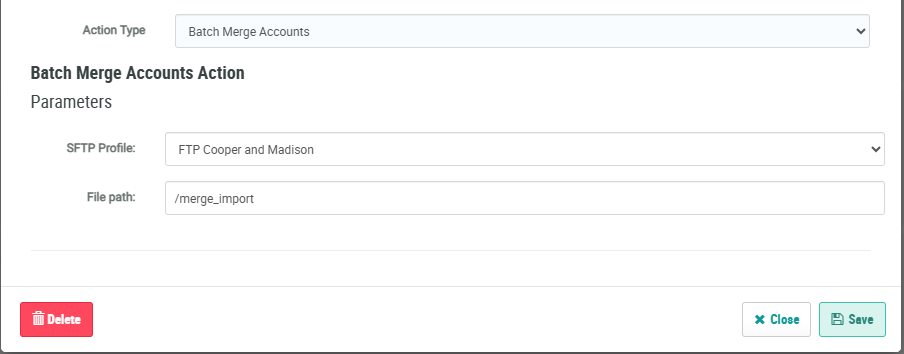
From the Action Type drop-down menu, select Batch Merge Accounts. The Batch Merge Accounts Action section is displayed.
-
From the SFTP Profile drop-down menu, select a Secure FTP Connection Profile.
-
In the File Path field, enter the file path on the FTP server where the file will be located.
-
Click Save.
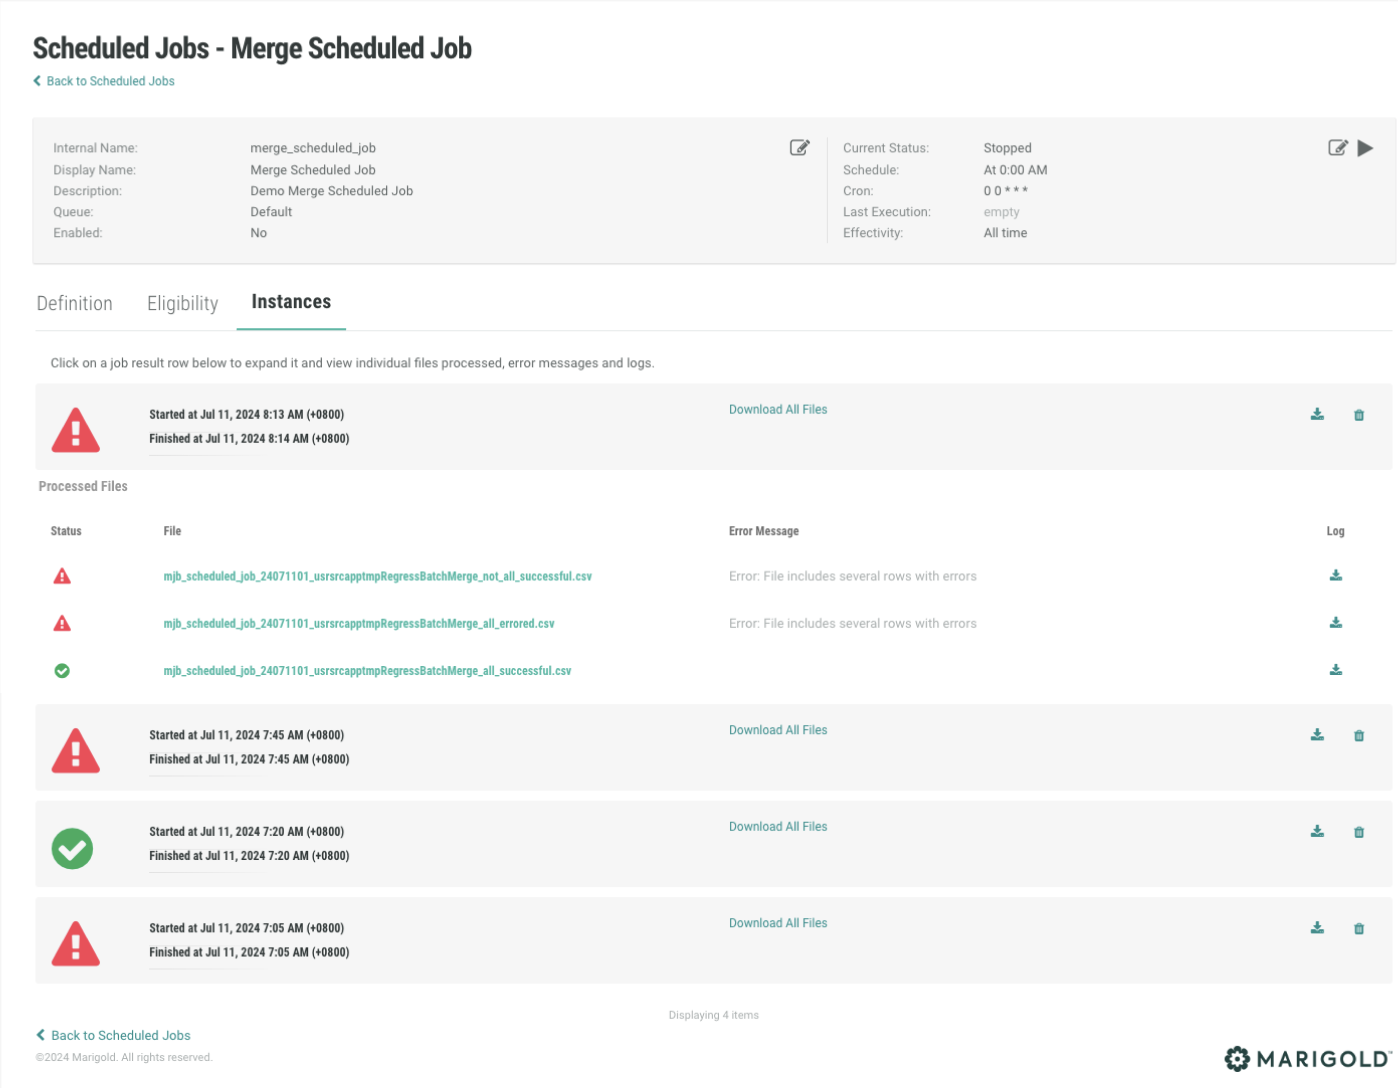
The Instances tab of the Scheduled Job Details screen acts as a detailed log of all job runs, including both successful and unsuccessful attempts, regardless of whether a file was processed. This feature is especially useful when files have been picked up and processed, as they then become available on this tab. You can download result files for a variety of purposes, including inspection or troubleshooting.
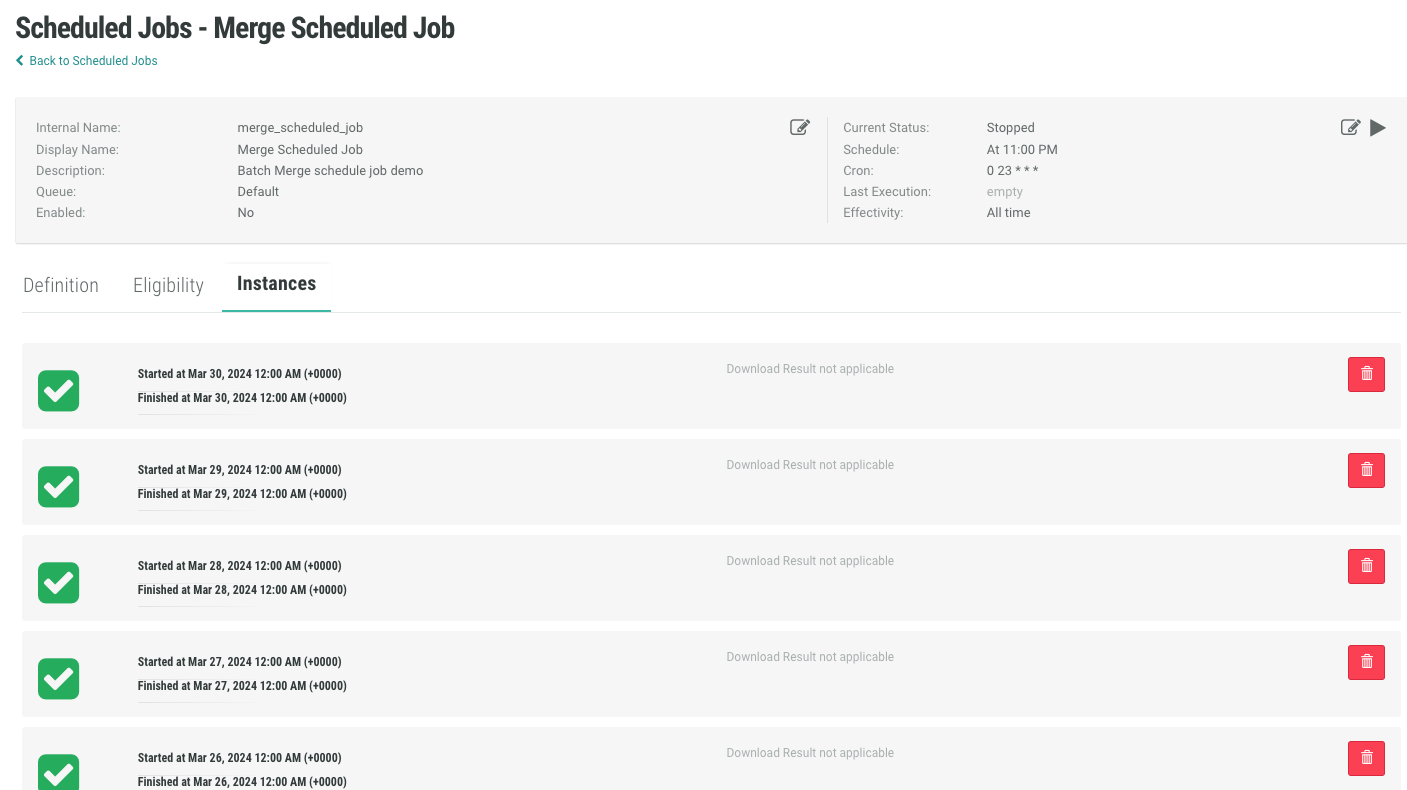
A Batch Merge Account Scheduled Job processes multiple files during each run. All files processed in a specific run are displayed under one Job Result instance on the Instances tab. You can access and identify which files were processed, which had error messages, and which job results belong to a specific run.
On the Instances tab, you can expand an instance to view individual files processed, error messages, and logs. The status indicates the success or failure of the Job Run as well as the processing status of the files. From the expanded instance, you can:
-
Download related files: All processed files from a single run are downloadable.
-
Download related logs: Logs related to the success / failure of the processed files are downloadable.
-
View error messages for each file when applicable: You have the option to view error messages for each processed file.
-
Delete job results: You can delete unwanted results by clicking the Delete icon.
For more information on editing a Scheduled Job, please see Scheduled Jobs.
